


Rien ne dit plus « amusant et ludique » qu'une manucure sur le thème des fruits ! Des cerises et citrons aux pastèques et pamplemousses — et parfois tous à la fois — ces designs vibrants envahissent la scène.
Que vous aimiez les ongles audacieux et colorés ou un accent fruité subtil, il y a un style frais et juteux pour chacun.
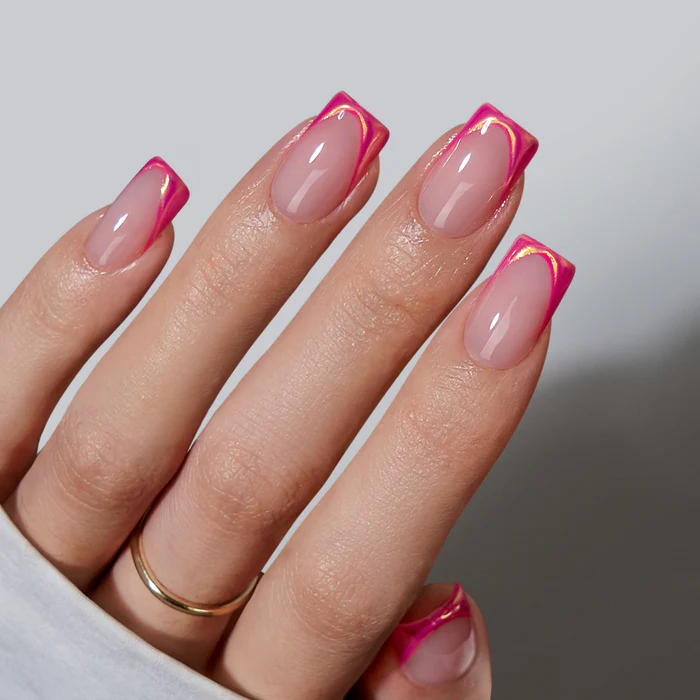
Optez pour des pointes fraise classiques, des tranches d'agrumes ou même un mélange de fruits tropicaux pour une manucure qui attire l'œil.
Parfait pour été et au-delà, ces designs apportent une touche de couleur et une pointe de fantaisie à vos ongles.
Découvrez les designs d'ongles fruit les plus tendance et trouvez votre look d'été parfait !
Designs d'ongles fruit pour une manucure douce
Les designs d'ongles fruit apportent un élément vibrant et amusant à l'art des ongles. Des détails complexes aux couleurs ludiques, ces designs peuvent imiter vos fruits préférés. Explorez différentes techniques pour obtenir des looks époustouflants qui se démarquent.
Motifs fruitiers classiques
🍓 Design d'ongles fruit fraise juteuse
L'art des ongles fraise offre un look ludique et lumineux. Pour créer ces designs, peignez vos ongles en rouge profond.
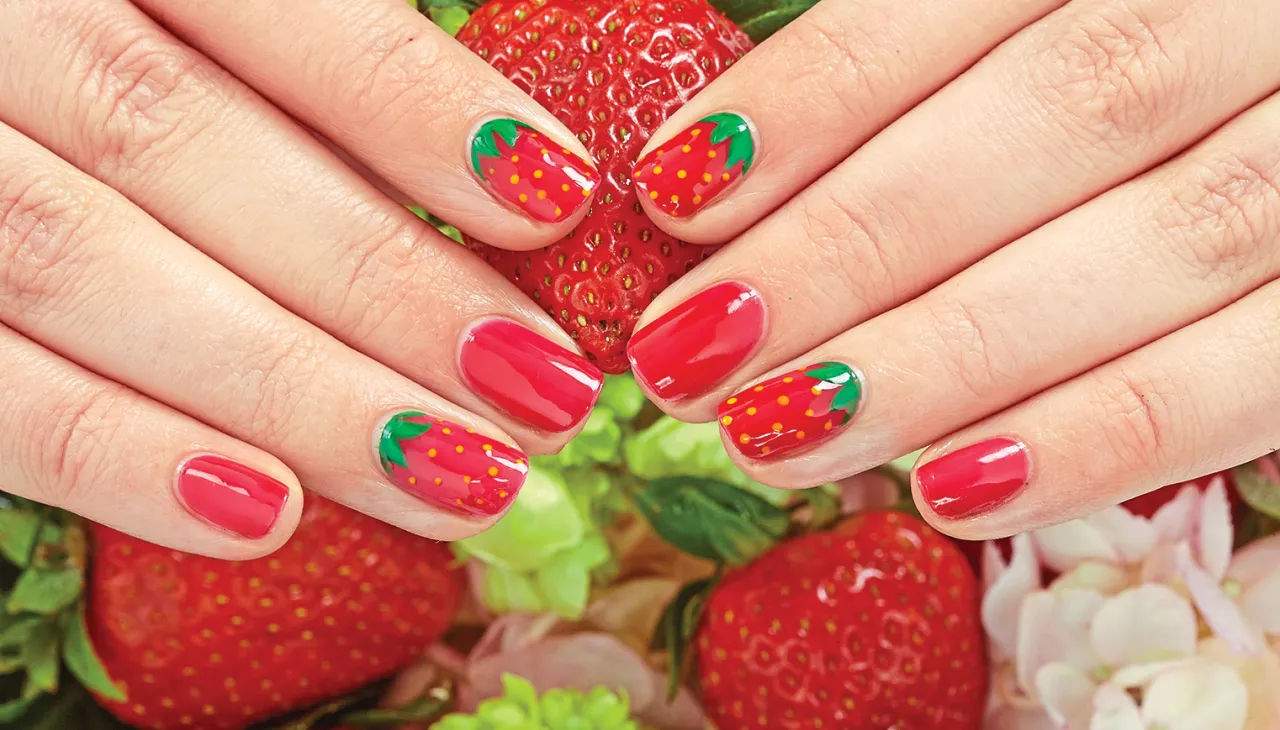
Ajoutez de minuscules points noirs pour les graines avec un pinceau fin ou un outil à points. Complétez le look avec des pointes vertes pour représenter les feuilles. Ce design est simple mais ajoute une touche sucrée à vos ongles.
🍉 Designs d'ongles fruit pastèque sucrée
Les designs pastèque sont parfaits pour l'été. Pour un aspect authentique, commencez avec une base verte aux extrémités. Utilisez un rose doux ou corail pour la couleur principale de l'ongle.
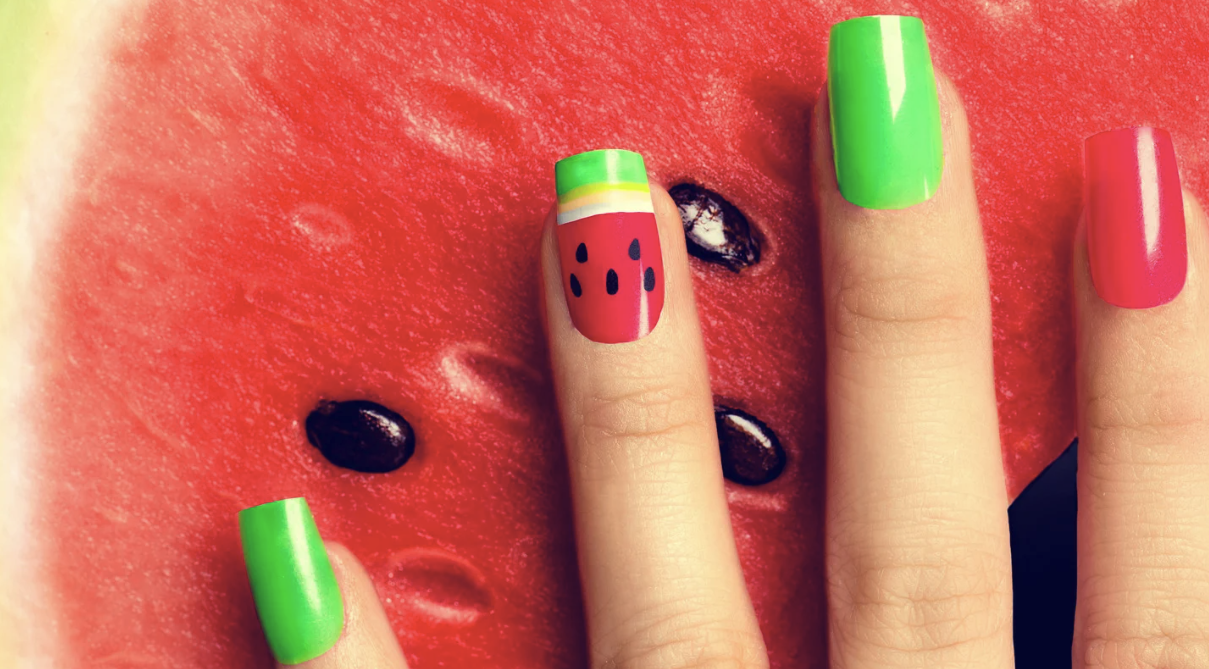
Des graines noires peuvent être ajoutées avec un outil à points. Les pointes vertes imitent l'écorce, créant un look frais et juteux.
🍒 Superbe design d'ongles cerises
L'art des ongles cerise peut être minimaliste ou détaillé. Pour un look simple, utilisez une base rouge vif et ajoutez de petits décalcomanies de cerises ou dessinez des cerises avec un pinceau fin.
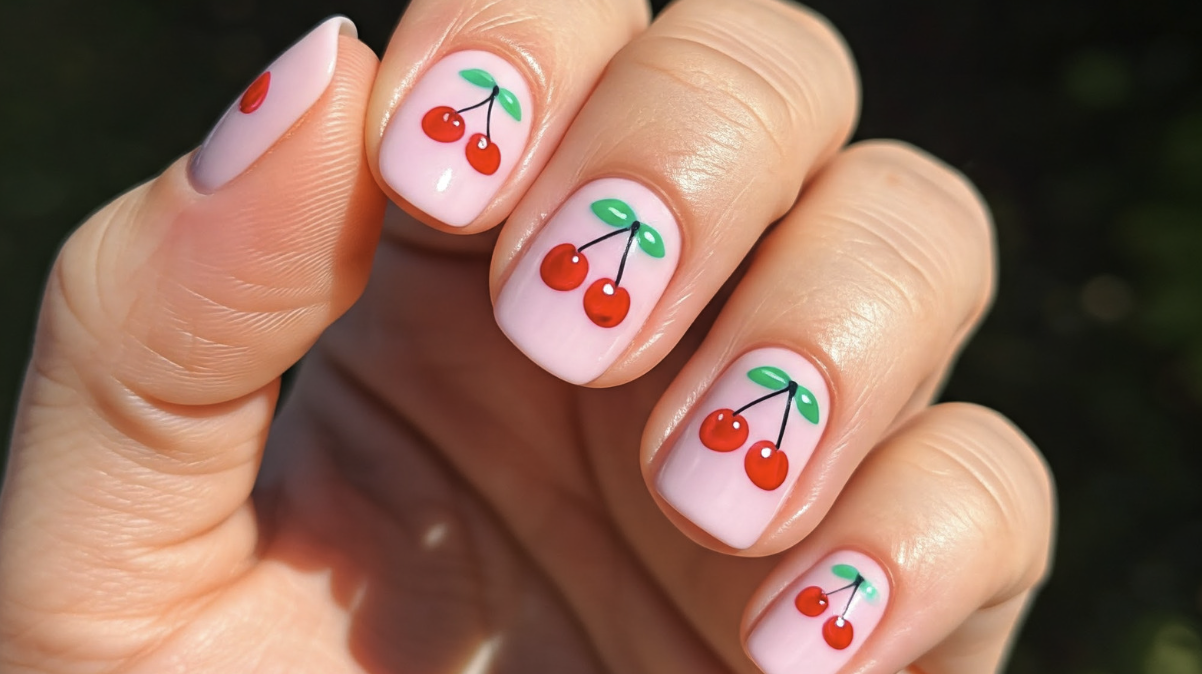
Pour plus de détails, incluez des tiges et des feuilles. Ces contrastes rouges et verts font ressortir les cerises sur des fonds simples.
🍊 Design d'ongles fruit agrume
Les agrumes comme les oranges, citrons et citrons verts sont lumineux et joyeux. Utilisez des techniques de dégradé pour créer des tranches réalistes.
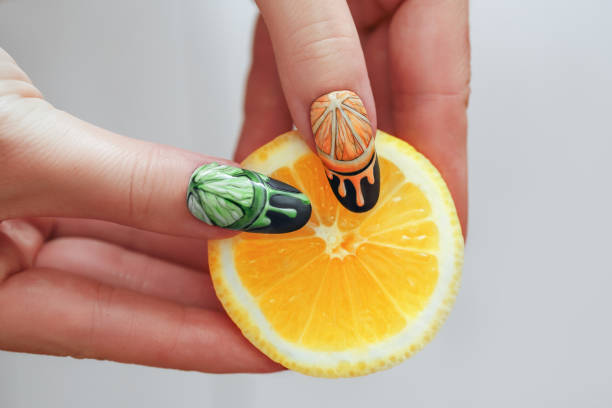
Commencez avec une base jaune, orange ou verte. Ensuite, superposez une couleur plus claire au centre et ajoutez de fines lignes blanches pour imiter les segments du fruit.
🫐 Design d'ongles fruit myrtille
Les designs d'ongles myrtille offrent un look élégant et raffiné. Utilisez un vernis bleu profond comme base. Pour plus d'intérêt, appliquez de petits points argentés ou blancs pour ressembler à de la rosée ou des reflets.

Ce design simple reste élégant et permet une expression créative.
🍇 Joli design d'ongles fruit raisin
Les raisins peuvent être représentés par des grappes et des accents de vigne. Peignez une base violet foncé ou bordeaux. Utilisez un outil à points pour créer des grappes de points de raisin.
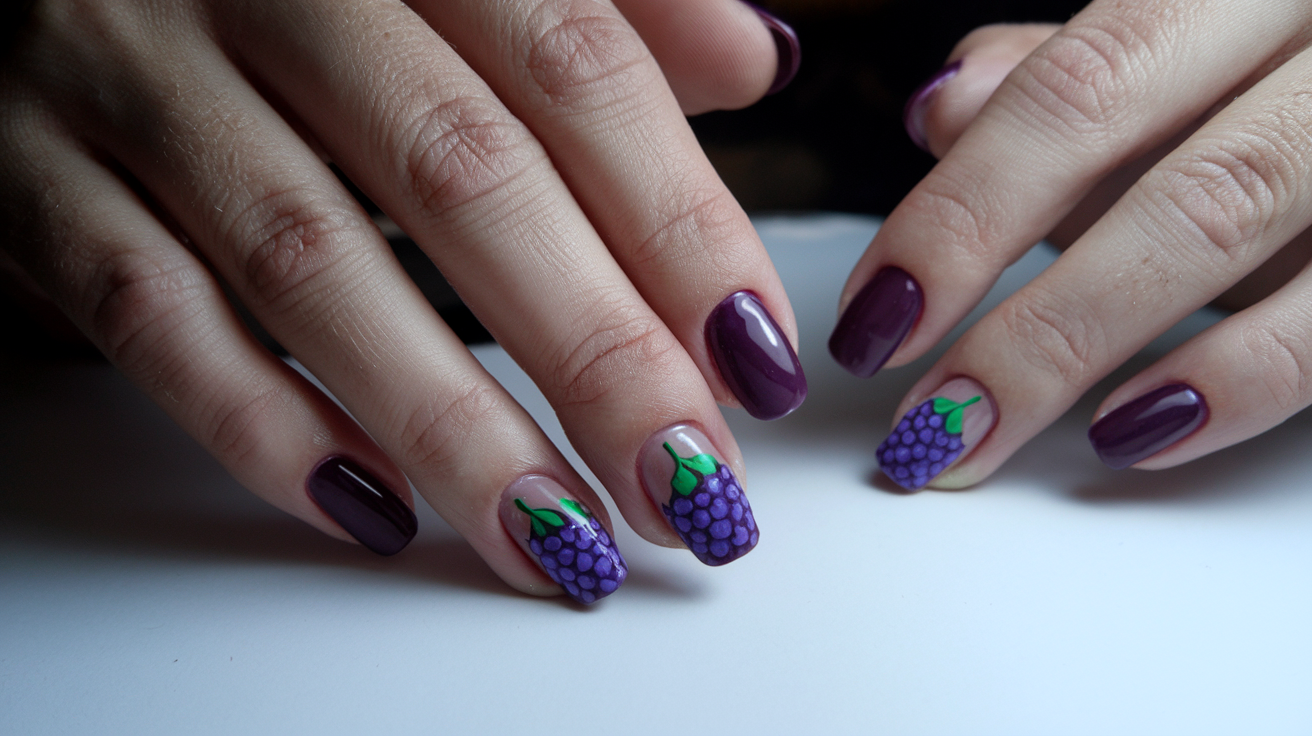
Pour les vrilles, peignez à la main des lignes en spirale ou utilisez des tampons. Ce design est luxuriant et ajoute une touche riche à tout nail art.
🍍 Ongles ananas
Les designs d’ongles ananas sont vivants et tropicaux. Utilisez un vernis jaune chaud pour la base. Des outils à points créent le motif en grille caractéristique pour le contraste.
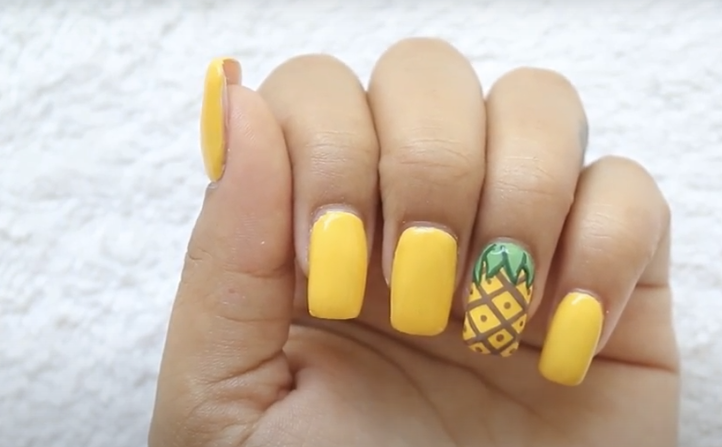
Photo : Ventuno Art
Pour plus d’éclat, appliquez du vernis pailleté sur les pointes. Ce design est vibrant, donnant à vos ongles un aspect juteux et frais.
Regardez comment faire : nail art ananas
🥝 Nail art kiwis chic
Le nail art kiwi repose sur les couches. Commencez par une base vert clair. Utilisez une teinte plus foncée pour le bord extérieur du kiwi.

Ajoutez de petits points noirs pour les graines vers le centre. Ce design multidimensionnel est détaillé et accrocheur.
🥭 Nail art mangues sucrées
Les ongles inspirés de la mangue capturent des tons chauds. Utilisez des nuances comme l’orange et l’or. Estompez ces couleurs doucement sur les ongles.
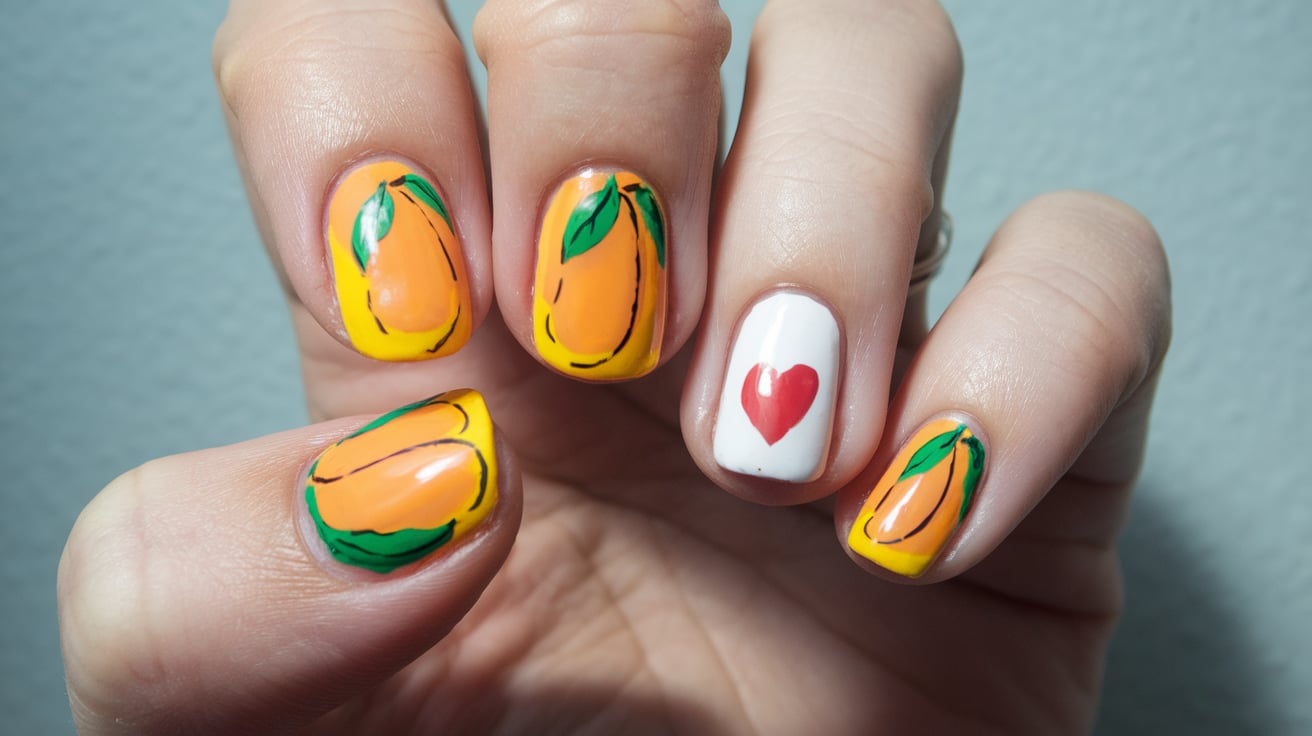
Cela crée une sensation douce et estivale. Parfait pour ceux qui aiment une ambiance tropicale.
📌 À lire aussi : 20 designs d'ongles amande tendance pour l'été à essayer
🪷 Nail art fruit du dragon
Les designs fruit du dragon jouent sur le contraste. Commencez par une base rose vif. Créez des taches blanches avec des points noirs ou brun foncé sur certaines zones.

Cette combinaison unique et exotique apporte du style à vos ongles.
Comment entretenir vos designs d'ongles fruités
Vous voulez garder votre nail art fruité frais et éclatant ? Suivez ces conseils simples :
Protégez votre design
- Appliquez un top coat tous les quelques jours – Cela aide à maintenir la brillance et à prévenir les éclats.
- Portez des gants pendant les tâches ménagères – Protégez vos ongles de l’eau et des produits chimiques agressifs lors de la vaisselle ou du nettoyage.
- Évitez d’utiliser vos ongles comme outils – Utilisez des outils appropriés pour ouvrir les paquets ou décoller les autocollants afin d’éviter éclats et cassures.
Gardez vos ongles en bonne santé
- Maniez le vernis gel avec douceur – Bien que résistant, le vernis gel peut s'écailler si les ongles sont maltraités.
- Hydratez régulièrement – Appliquez de l'huile pour cuticules et une crème pour les mains pour garder ongles et peau hydratés.
- Enlevez le vernis correctement – Évitez de décoller ou gratter le vernis gel ; utilisez des dissolvants adaptés pour protéger vos ongles naturels.
Gardez vos ongles fruités vibrants et stylés en suivant ces conseils. Ils vous aideront à prolonger la durée et la beauté de vos créations. 🍓🍊💅
Tutoriels & inspiration pour nail art fruité
Vous cherchez des designs d'ongles fruités amusants ? Découvrez ces tutoriels :
- DIY facile pour débutants – YouTube offre des tutoriels étape par étape pour créer des motifs fruités avec des outils basiques. Découvrez : Tutoriel de nail art DIY
- Designs d'ongles courts – TikTok propose des tutoriels rapides utilisant du vernis classique pour des ongles fruités et estivaux.
- Ongles agrumes & tropicaux – Pinterest regorge de designs tendance sur le thème des agrumes, incluant des espaces négatifs et des motifs tropicaux.
- Ongles fruités 3D – Essayez un Tutoriel YouTube pour ongles fruités en gel 3D qui ajoutent un effet amusant et texturé.
Soyez créatif et donnez vie à vos idées d’ongles fruités !
📌 Conseils rapides
- Matériel nécessaire : Vernis à ongles, outils à points, pinceaux fins.
- Technique : Commencez par des couleurs claires en base, puis construisez votre design fruité en couches.
- Style : Mélangez des couleurs vives et audacieuses pour un look accrocheur.
L’inspiration est partout. Parcourir un tableau de nail art fruité sur Pinterest peuvent aussi inspirer de nouvelles idées pour vos créations.
Conseils de nail art fruité pour débutants
Vous commencez avec des designs d’ongles fruités ? Voici comment garder ça simple et amusant :
1. Rassemblez vos essentiels
- Vernis à ongles en couleurs inspirées des fruits
- Un pinceau fin pour les détails
- Un top coat pour protection et brillance
- Outils à points (ou cure-dent/extrémité de pinceau) pour les petits détails
2. Préparez d’abord vos ongles
- Enlevez l’ancien vernis et limez les ongles en forme pour une base lisse.
- Assurez-vous que les ongles sont propres et secs avant d’appliquer le vernis.
3. Commencez par des designs simples
- Essayez des motifs faciles comme les cerises ou les pastèques.
- Commencez par des points et contours basiques avant de passer à des designs plus détaillés.
4. Utilisez la bonne couleur de base
- Une base blanche ou rose pâle fait ressortir les couleurs des fruits.
- Pour un look plus doux, utilisez une base laiteuse.
5. Facilitez les détails
- Utilisez des outils à points pour des cercles parfaits, des graines ou des baies.
- Pas d’outil à points ? Essayez un cure-dent ou l’extrémité d’un pinceau fin.
6. Terminez avec un Top Coat
- Scelle et protège votre design.
- Apporte de la brillance et aide votre nail art à durer plus longtemps.
Avec ces conseils faciles pour débutants, vous créerez en un rien de temps des designs d’ongles fruités mignons et vibrants !
Dernières pensées
Les designs d’ongles fruités sont parfaits pour ajouter une touche de couleur et de fun à votre look estival. Que vous aimiez le charme audacieux des cerises, les vibes tropicales des ananas ou l’attrait acidulé des tranches d’agrumes, il y a une manucure fruitée pour tout le monde.
Ces designs ludiques apportent de l’énergie à votre style et sont un excellent moyen de montrer votre créativité.
Vous n’avez pas le temps pour un nail art détaillé ? Essayezongles press-on en couleurs inspirées des fruits pour une façon rapide et facile de suivre la tendance.
Préparez-vous à exhiber des ongles frais et juteux tout l’été !
Découvrez les couleurs d’ongles press-on inspirées des fruits
|
|
Ongles Amande Milkshake Raisin - Ongles Press-OnMilkshake Raisin – Un violet pastel rêveur avec une touche crémeuse, parfait pour un look subtil mais amusant. |
|
|
Ongles Amande Baies Sauvages - Ongles Press-On
Baies Sauvages – Un mélange riche de nuances profondes de baies, inspiré des myrtilles, framboises et mûres. |
|
|
Ongles carrés Metallic Petal - Ongles press onRose pour fraise – Un rose doux et sucré qui capture le charme frais et ludique des fraises. |
|
|
Ongles ovales Mulled Wine - Ongles press onRouge pour pastèque – Un rouge audacieux et juteux qui apporte l'ambiance estivale directement à vos ongles. |


Questions fréquemment posées
Les designs d'ongles fruités sont une façon amusante et vibrante d'exprimer votre style. Vous pouvez les créer avec du vernis classique ou essayer des techniques plus avancées pour des effets 3D. Ci-dessous, trouvez les réponses aux questions courantes sur la réalisation de divers designs d'ongles à thème fruit.
Comment faire des designs d'ongles ananas ?
Pour créer des ongles ananas, commencez par une base jaune. Utilisez un pinceau fin pour dessiner des feuilles vertes et pointues à la base des cuticules. Ajoutez de fines lignes brunes pour la texture afin d'imiter la surface de l'ananas. Ce design simple est vivant et tropical.
Quelle couleur va avec les ongles pêche ?
Les ongles pêche s'accordent bien avec des teintes comme le vert menthe, le corail et la lavande. Ces couleurs douces mettent en valeur le look frais des designs à thème pêche sans les écraser. Essayez d'alterner ces couleurs pour une manucure harmonieuse et jolie.
Comment réaliser un nail art fruité 3D à la maison ?
Pour un nail art fruité 3D, utilisez de l'acrylique pour sculpter de petites formes de fruits. Vous pouvez aussi appliquer des autocollants ou décalcomanies pour un effet en relief. Commencez par des formes simples comme des baies, puis passez progressivement à des fruits plus complexes. Scellez avec un top coat transparent pour la durabilité.
Quels sont les 5 designs d'ongles basiques ?
Quelques designs d'ongles basiques incluent les ongles unis, les french tips, l'ombré, les motifs géométriques et les autocollants de nail art simples. Chacun offre une base sur laquelle vous pouvez construire des designs fruités détaillés. Entraînez-vous à ces bases pour améliorer vos compétences en nail art.
Comment faire des cerises sur les ongles ?
Pour dessiner des cerises sur les ongles, commencez par une base de couleur claire. Utilisez un outil à points pour ajouter deux cercles rouges représentant les cerises. Ensuite, dessinez des tiges vertes et une petite feuille avec un pinceau fin. Ce design est frais et facile à réaliser avec des outils basiques.
Comment choisir une forme d'ongle press on ?
Lors du choix d'une forme d'ongle press on, prenez en compte la forme de vos doigts et vos activités quotidiennes. Les formes ovales ou amandes sont polyvalentes et conviennent à la plupart des mains. Si vous préférez un look audacieux, les formes stiletto ou cercueil peuvent sublimer vos designs d'ongles fruités.


